RHCSA Rapid Track
Course update
An updated version of this course is available that uses a newer version of Red Hat Enterprise Linux in the lab environment. Therefore, the RHEL 9.0 version of the lab environment will retire on December 31, 2024. Please complete any work in this lab environment before it is removed on December 31, 2024. For the most up-to-date version of this course, we recommend moving to the RHEL 9.3 version.
Abstract
| Goal | Control network connections to services with the system firewall and SELinux rules. |
| Objectives |
|
| Sections |
|
| Lab |
Manage Network Security |
The Linux kernel provides the netfilter framework for network traffic operations such as packet filtering, network address translation, and port translation.
The netfilter framework includes hooks for kernel modules to interact with network packets as they traverse a system's network stack.
Fundamentally, netfilter hooks are kernel routines that intercept events (for example, a packet that enters an interface) and run other related routines (for example, firewall rules).
The nftables packet classification framework builds on the netfilter framework to apply firewall rules to network traffic.
In Red Hat Enterprise Linux 9, the nftables framework is the system firewall core, and it replaces the deprecated iptables framework.
The nftables framework provides many advantages over iptables, including improved usability and more efficient rule sets.
For example, the iptables framework required a rule for each protocol, but nftables rules can apply to both IPv4 and IPv6 traffic simultaneously.
The iptables framework required using different tools, such as iptables, ip6tables, arptables, and ebtables, for each protocol.
By contrast, the nftables framework uses the single nft user-space utility to manage all protocols through a single interface.
Note
Convert earlier iptables configuration files into their nftables equivalents by using the iptables-translate and ip6tables-translate utilities.
The firewalld service is a dynamic firewall manager, and is the recommended front end to the nftables framework.
The Red Hat Enterprise Linux 9 distribution includes the firewalld package.
The firewalld service simplifies firewall management by classifying network traffic into zones.
A network packet's assigned zone depends on criteria such as the source IP address of the packet or the incoming network interface.
Each zone has its own list of ports and services that are either open or closed.
Note
For laptops or other machines that often change networks, the NetworkManager service can automatically set the firewall zone for a connection.
This service is useful when switching between home, work, and public wireless networks.
A user might want their system's sshd service to be reachable when connected to their home or corporate networks, but not when connected to a public wireless network in the local coffee shop.
The firewalld service ensures the source address for every incoming packet into the system.
If that source address is assigned to a specific zone, then the rules for that zone apply.
If the source address is not assigned to a zone, then the firewalld service associates the packet with the zone for the incoming network interface, and the rules for that zone apply.
If the network interface is not associated with a zone, then the firewalld service sends the packet to the default zone.
The default zone is not a separate zone but rather an assigned designation to an existing zone.
Initially, the firewalld service designates the public zone as default, and maps the lo loopback interface to the trusted zone.
Most zones allow traffic through the firewall if it matches a list of particular ports and protocols, such as 631/udp, or a predefined service configuration, such as ssh.
Normally, if the traffic does not match a permitted port and protocol or service, then it is rejected.
The trusted zone, which permits all traffic by default, is an exception.
The firewalld service uses predefined zones, which you can customize.
By default, all zones allow any incoming traffic that is part of an existing session that system initiated, and also allow all outgoing traffic.
The following table details the initial zone configuration.
Table 15.1. Default Configuration of Firewalld Zones
| Zone name | Default configuration |
|---|---|
trusted
| Allow all incoming traffic. |
home
| Reject incoming traffic unless related to outgoing traffic or matching the ssh, mdns, ipp-client, samba-client, or dhcpv6-client predefined services. |
internal
| Reject incoming traffic unless related to outgoing traffic or matching the ssh, mdns, ipp-client, samba-client, or dhcpv6-client predefined services (same as the home zone to start with). |
work
| Reject incoming traffic unless related to outgoing traffic or matching the ssh, ipp-client, or dhcpv6-client predefined services. |
public
| Reject incoming traffic unless related to outgoing traffic or matching the ssh or dhcpv6-client predefined services. The default zone for newly added network interfaces.
|
external
| Reject incoming traffic unless related to outgoing traffic or matching the ssh predefined service. Outgoing IPv4 traffic that is forwarded through this zone is masqueraded to appear that it originated from the IPv4 address of the outgoing network interface. |
dmz
| Reject incoming traffic unless related to outgoing traffic or matching the ssh predefined service. |
block
| Reject all incoming traffic unless related to outgoing traffic. |
drop
| Drop all incoming traffic unless related to outgoing traffic (do not even respond with ICMP errors). |
For a list of available predefined zones and their intended use, see the firewalld.zones(5) man page.
The firewalld service includes predefined configurations for common services, to simplify setting firewall rules.
For example, instead of researching the relevant ports for an NFS server, use the predefined nfs configuration create rules for the correct ports and protocols.
The following table lists some predefined service configurations that might be active in your default firewalld zone.
Table 15.2. Selected Predefined Firewalld Services
| Service name | Configuration |
|---|---|
ssh
| Local SSH server. Traffic to 22/tcp. |
dhcpv6-client
| Local DHCPv6 client. Traffic to 546/udp on the fe80::/64 IPv6 network. |
ipp-client
| Local IPP printing. Traffic to 631/udp. |
samba-client
| Local Windows file and print sharing client. Traffic to 137/udp and 138/udp. |
mdns
| Multicast DNS (mDNS) local-link name resolution. Traffic to 5353/udp to the 224.0.0.251 (IPv4) or ff02::fb (IPv6) multicast addresses. |
cockpit
| Red Hat Enterprise Linux web-based interface for managing and monitoring your local and remote system. Traffic to 9090 port. |
The firewalld package includes many predefined service configurations.
You can list the services with the firewall-cmd --get-services command.
[root@host ~]# firewall-cmd --get-services
RH-Satellite-6 RH-Satellite-6-capsule amanda-client amanda-k5-client amqp amqps
apcupsd audit bacula bacula-client bb bgp bitcoin bitcoin-rpc bitcoin-testnet
bitcoin-testnet-rpc bittorrent-lsd ceph ceph-mon cfengine cockpit collectd
...output omitted...
If the predefined service configurations are not appropriate for your scenario, then you can manually specify the required ports and protocols. You can use the web console graphical interface to review predefined services and manually define more ports and protocols.
The following list shows two common ways that system administrators use to interact with the firewalld service:
The web console graphical interface
The
firewall-cmdcommand-line tool
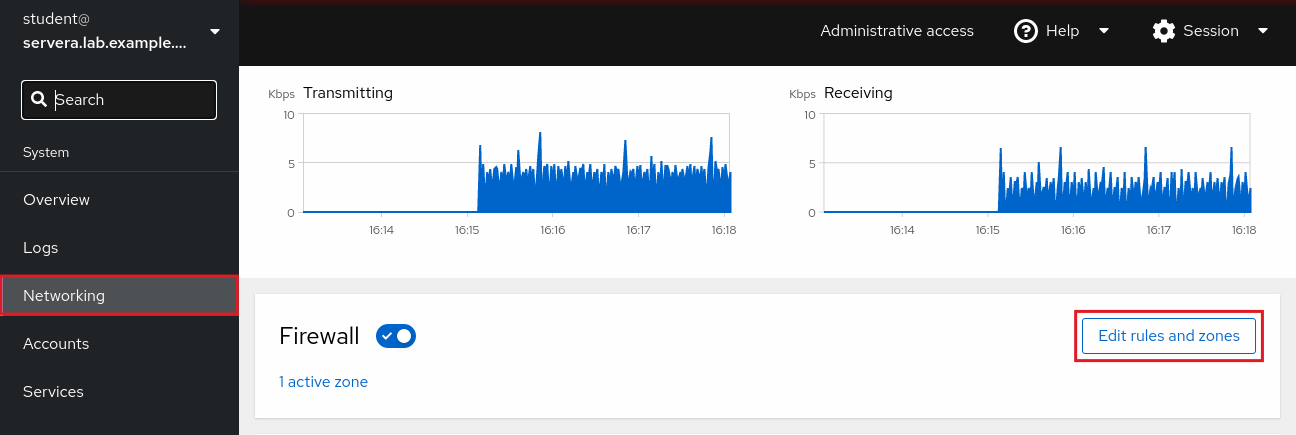
To manage firewall services with the web console, you must log in and escalate privileges. You can escalate privileges by clicking the or buttons. Then, enter your password when prompted. The administrative mode elevates privileges based on your user's sudo configuration. As a security reminder, remember to toggle back to limited access mode after you perform the system task that requires administrative privileges.
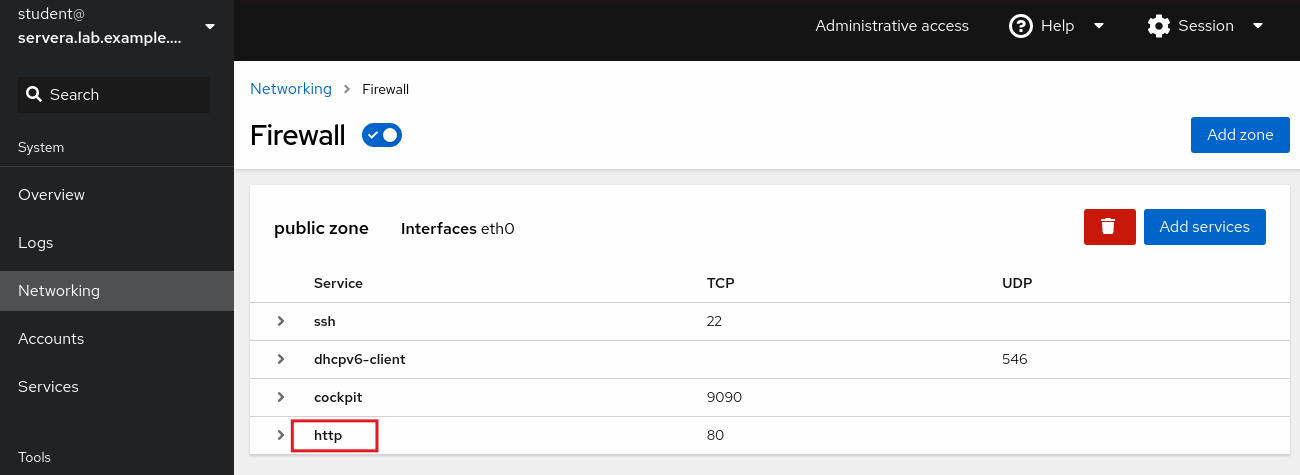
Click the option in the left navigation menu to display the section in the main networking page. Click the button zones to navigate to the page.
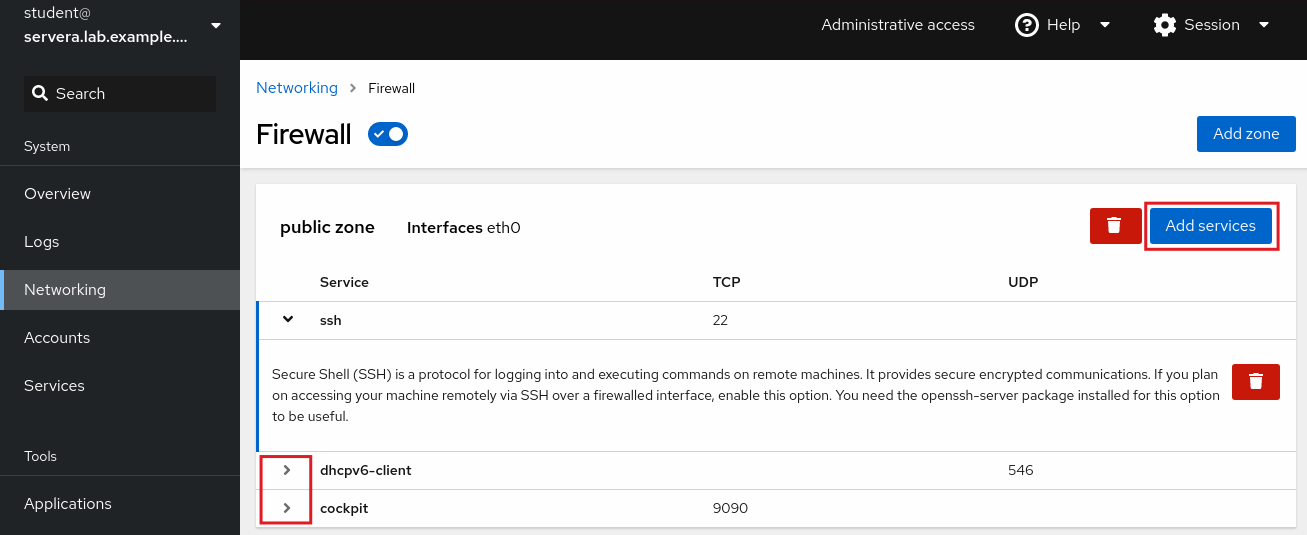
 |
The page displays active zones and their allowed services. Click the arrow () button to the left of a service name to view its details. To add a service to a zone, click the button in the upper right corner of the applicable zone.
 |
The page displays the available predefined services.
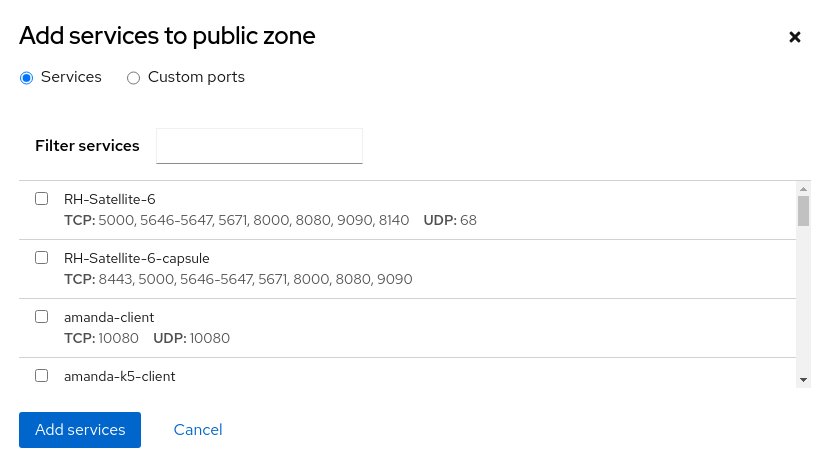 |
To select a service, scroll through the list or enter a selection in the text box.
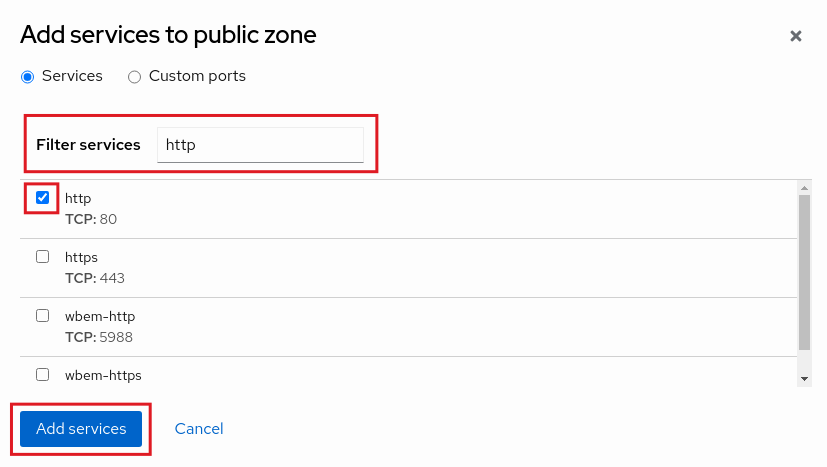
In the following example, the http string filters the options to web-related services.
Select the checkbox to the left of the service to allow it through the firewall.
Click the button to complete the process.
 |
The interface returns to the page, where you can review the updated allowed services list.
 |
The firewall-cmd command interfaces with the firewalld daemon.
It is installed as part of the firewalld package, and is available for administrators who prefer to work on the command line, for working on systems without a graphical environment, or for scripting a firewall setup.
The following table lists often use firewall-cmd commands, along with an explanation.
Most commands work on the runtime configuration, unless the --permanent option is specified.
If the --permanent option is specified, then you must activate the setting by also running the firewall-cmd --reload command, which reads the current permanent configuration and applies it as the new runtime configuration.
Many of the listed commands take the --zone= option to find which zone they affect.
Where a netmask is required, use CIDR notation, such as 192.168.1/24.ZONE
| firewall-cmd commands | Explanation |
|---|---|
--get-default-zone
| Query the current default zone. |
--set-default-zone=
| Set the default zone. This default zone changes both the runtime and the permanent configuration. |
--get-zones
| List all available zones. |
--get-active-zones
| List all zones that are currently in use (with an interface or source that is tied to them), along with their interface and source information. |
--add-source=
| Route all traffic from the IP address or network/netmask to the specified zone. If no --zone= option is provided, then the default zone is used. |
--remove-source=
| Remove the rule that routes all traffic from the zone that comes from the IP address or network. If no --zone= option is provided, then the default zone is used. |
--add-interface=
| Route all traffic from --zone= option is provided, then the default zone is used. |
--change-interface=
| Associate the interface with ZONE instead of its current zone. If no --zone= option is provided, then the default zone is used. |
--list-all [--zone=
| List all configured interfaces, sources, services, and ports for --zone= option is provided, then the default zone is used. |
--list-all-zones
| Retrieve all information for all zones (interfaces, sources, ports, and services). |
--add-service=
| Allow traffic to --zone= option is provided, then the default zone is used. |
--add-port=
| Allow traffic to the --zone= option is provided, then the default zone is used. |
--remove-service=
| Remove --zone= option is provided, then the default zone is used. |
--remove-port=
| Remove the --zone= option is provided, then the default zone is used. |
--reload
| Drop the runtime configuration and apply the persistent configuration. |
The following example sets the default zone to dmz, assigns all traffic coming from the 192.168.0.0/24 network to the internal zone, and opens the network ports for the mysql service on the internal zone.
[root@host ~]#firewall-cmd --set-default-zone=dmz[root@host ~]#firewall-cmd --permanent --zone=internal \--add-source=192.168.0.0/24[root@host ~]#firewall-cmd --permanent --zone=internal --add-service=mysql[root@host ~]#firewall-cmd --reload
As another example, to add all the incoming traffic from the 172.25.25.11 single IPv4 address to the public zone, use the following commands:
[root@host ~]#firewall-cmd --permanent --zone=public \--add-source=172.25.25.11/32[root@host ~]#firewall-cmd --reload
Note
For situations where the basic syntax is not enough, you can add rich-rules to write complex rules.
If even the rich-rules syntax is not enough, then you can also use Direct Configuration rules (which use raw nft syntax mixed in with firewalld rules).
These advanced configurations are beyond the scope of this chapter.